Thursday, September 8, 2011

LESSONS FROM GIFTS

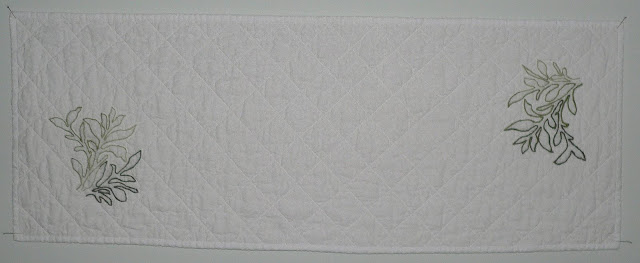
14" X 37"

 For the beginnings of this project see:

This project was an eye opener (lesson) for me.  I've never embroidered a table runner before and when it came time to add borders, I added and ripped 3 versions.  I should have taken pictures to show you, but at the time I was upset my ideas didn't work (on paper they looked good but when applied they looked tacky).  It was the same when I planned the embroidery.  I had planned four design sections (see the blog "Wedding Gift Season"), and was glad I completed one section on each corner first.  The extra sections would have made it too cluttered.  I didn't want to compete with the platters or the vase she might be using on it.

I have only Quilted on my regular sewing machine once and never quilted by hand.  I did both here.

These pictures are of the two embroidered units on the quilt:
 
                          LEFT UNIT                 RIGHT UNIT

I don't know if you can see it but I tried my hand at hand quilting.  I outlined the two units.  I started with a hoop and two thimbles.  I used the plastic ones that are fitted to the fingers.  I used one on the under finger and one on the right middle finger.  I moved them around to other fingers during the experimental stage.  I was very interested in learning to do this because I want to hand quilt a huge quilt I have named "Treasured Time".   I have attached all but one border which is pinned on awaiting me to sew it on.  It is king size.  I have been working on it for 10 years.  It is a king size quilt entirely pieced by hand.  Pics will be available as soon as the border is attached.  I don't know if I will be up to the task of hand quilting it but I know it is too fragile to put on the quilt machine.  I know from doing this little bit I need a teacher or a good book.   Another lesson I learned from the small project is I will have to have this huge quilt on rails.  It is too much to handle in my lap. 

I had to discard the hoop when I was half way through one of the units.  It was very uncomfortable for me to use.  and then I discarded the right hand thimble.  I was more comfortable using my finger nails to push and control the needle.  I did give it the "ole college try".  but I do need help. 

The rest of the runner I marked with the blue pencil and quilted on the machine.  I didn't mention I thread basted the runner every four inches both ways.  I wish I had done it every two inches.  It seemed there was too much play in the fabrics and batting.  I used the even feed quilting foot which came with my Janome machine.  I had tried  to use the quilting bar once and was very disappointed in my consistency with it.  I knew if I measured and marked it would be even.

I was very glad I had not pre-washed the fabric before I embroidered on it.  I didn't pre-wash the backing or the batting either (the backing is the same fabric as the front).   I used Hobbs 20/80.  They did shrink up giving the runner an old item, with a soft feel and look.

On the back I didn't put a lable.  I just embroidered my name into the backing.  I did not want to personalize the runner till I find out if they like it and want to keep it.  If they do then I will take it home and put their names and date on it.

Every gift needs a card to accompany it.   I used the embroidery pattern to design the card.  It is printed on card stock and colored in with colored pencils.  The size is 6 X 9 inches.

For the inside I printed a piece of onion skin with design and line drew the colors.  Inside I wrote care instructions with the fabric contents of the runner.

Thank you for visiting.  I love sharing my projects.  All writings, patterns, and pictures shown here are mine.  Please ask permission before using.  (Credit is given for items not my own)
Thursday, September 1, 2011

FOR A WEDDING


WEDDING GIFT SEASON

I don't know if there is a season for wedding gifts, around my house they are in season all the time.  I suppose it comes with the territory.  That territory being a large family.  I am the oldest of 6 siblings; 4 girls and 2 boys.  My youngest sister has had one wedding recently. 
Then we found out there is to be another wedding, the last of October.  I drove to Denver last week to deliver a quilt for them, just in case I couldn't go in October.  The following is about that quilt:


My husband's family has surprised us with a Wedding in Vegas.  The couple, has their registries.  I don't know the wife well. I went to the registries to find her colors.  I had thought I would make her a set of place mats and napkins for her kitchen.  I saw something I knew would be one of a kind and she wouldn't be able to buy it anywhere.  She had chosen  the Lenox Botanical Boutique collection.  There is a platter in the group (the following is a pix of it)
Lenox Botanical Boutique Platter
This picture came from http://www.tableandhome.com/prodbbgefh site.

I copied the picture, enlarged it until it was approximately the size of the actual platter (I had to go to 350%).  Then I traced it onto white paper.  I had decided to make a table runner which could be used under the vases and platters.  The following is the plan, but I still had to decide how to execute it.

I had thought I would probably applique.
 My applique skills are on the good side (I don't do iron on applique).  But as I looked at the pattern on the paper I thought , "This has to be done by September 11th."  No Way, popped into my head. 
I re-looked at the googled images and noticed they seemed to have variegated colors.
I am hoping this is not a camera reflection.
I decided to execute the designs in embroidery.  My Needlework skills are so-so, but I figured I could do acceptable on at least one stitch.  I tried a back stitch and it looked terrible.  I pulled out the stitches and tried a split stitch.  It looked worse.  Then I tried a stem stitch.  It looked nice.  While I've been doing it I have developed a rhythm which may not be the correct stitch but it is working for me.

Pencil used in tracing the pattern onto the fabric.

 I used a blue quilt marking pencil to draw the pattern on the fabric. 
The fabric is white on white that has an extremely small design on it. 
It gives it the look it is frosted (the glass on the items is frosted crystal). 

I am tracing one section at a time.  I have finished a section and I am working on the second section. 
I started on opposite corners.  I don't know if I want use all four sections I have planned.

Hooped section I am working on.


Finished section unpressed, because I don't want to press in any dirt that might be on it.


As you can see I have chosen 6 skeins.  Each one with an "olive" edge to it.  These are DMC floss.  They are current.  I just purchased them on the 29th.

I can't tell you what size needle I am using.  I pulled it out of the pin cushion and used it.  I picked it because it has an eye, just big enough to get two strands of thread through with a needle threader and it had a great point.

I have not planned borders or any other finishing.  I do have a batik downstairs with the correct colors.  Right now I think I will only do the two patterns on opposite corners.  I don't want it to be too busy to set the items on (when I finish the second pattern I will make a decision if it needs more designs).

The fabric was from my stash as will be the borders and binding, but alas, I did not have any of the correct color of thread so I had to relent and buy.  This was not my first transgression.  While in Denver (I was working on my hand pieced king size quilt.  this project is over 10 years old)  I went to the LQS and purchased a yard of navy Batik.  I had no more of the Jenny Beyer "eye lash" navy RJR fabric which I used to border the quilt.  That fabric was purchased over 10 years ago in Denver at their annual shop hop.  It was the year Jenny produced her "Moon Glow quilt".

When I came home with the fabric and the quilt I discovered the blue in Natural light was not what I want.  I will search my stash but I am fairly positive there won't be anything there.  My stash is not blue heavy.

Thank you for visiting. 
 I love sharing my projects.  All writings, patterns, and pictures are mine.  Please ask permision before using.  (Credit is given for items not my own)